The three files we will be working with are:
- MainActivity.java (located in the src/(package name) folder)
- activity_main.xml (located in the res/layout folder)
- strings.xml (located in the res/values folder)
When we first run the app, the welcome screen will look like this:
 |
| This is a basic Hello world! app (it will not look like this much longer). |
The first thing we will do is enter the strings.xml file where we will add a few captions that will be used by the welcome screen. The entries we will be using will be new caption for the app, levels of difficulty and a how to play caption. The levels of difficulty will be Easy, Medium, Hard and Super Hard. In the strings.xml file, you create a new string value by typing:
<string name="captionName">Caption Value</string>
When you're done, you should have the following lines;
<string name="cowsBells">CowsBells Free Version</string>
<string name="easy">Easy</string>
<string name="medium">Medium</string>
<string name="hard">Hard</string>
<string name="superHard">Super Hard</string>
<string name="howToPlay">How To Play</string>
We can now move on to the activity_main.xml file, where we can work with the hello world message, which is located in a TextView. We want to add some properties to this TextView, such as:
- android:id - name of the particular item
- android:layout_width - item's layout width
- android:layout_height - item's layout height
- android:layout_centerHorizontal - do you want to center the layout horizontally (for this case, the value is set to true)
- android:layout_marginTop - margin from the top of the item
- android:text - text value of the item
They are initially setup in the following format:

When you're done, your TextView should look like this:

If you were to build the app and run it, it will now look like this:
 |
| Not bad, but there's more to come. |
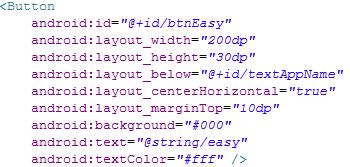
Now, we want to add some buttons so we can play the game based on difficulty level or if we simply want to learn how to play. The Button object is used to display buttons on an app. They require most of the same attributes as a TextView except they also require other attributes such as:
- android:layout_below - which element would you like to place it below
- android:background - background color for the button
- android:textColor - text color for the button
When you're done, your button should look like the following:
Once you add all the buttons, you can run your app again and it will now look like this:
 |
| Far cry from what it looked like earlier, it'll get better later. |
Now we can delve into the source code that makes this app tick. We open the MainActivity.java and go into the onCreate function, which initially looks like this:

The first thing you want to do is declare a Button object for each button in the activity. Then you want to set an on click listener once a user clicks on any of the buttons in the activity and it is usually a new OnClickListener. They will normally open a new activity but for this exercise, we will make them display a brief message. In order to do that, we use the Toast object. The Toast object uses the makeText function to create the text message for a set period of time and the show function to display the message. Once you're done, you should have your code for a Button look like this:

Once you add the code for the remaining buttons, run your app and press on one of the buttons and you get this:
 |
| Came a long way from where it started. |
No comments:
Post a Comment